Showing posts with label Creating a Digital Photo Book. Show all posts

16.9.10

Photo Book Revisited!

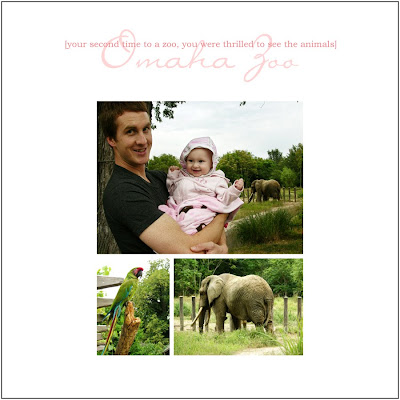
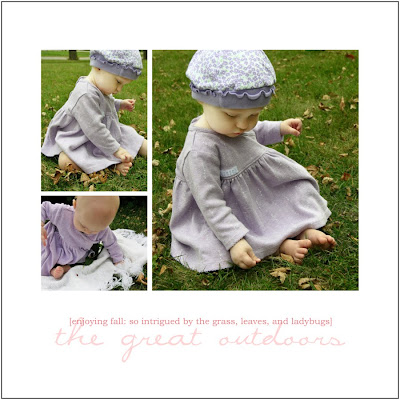
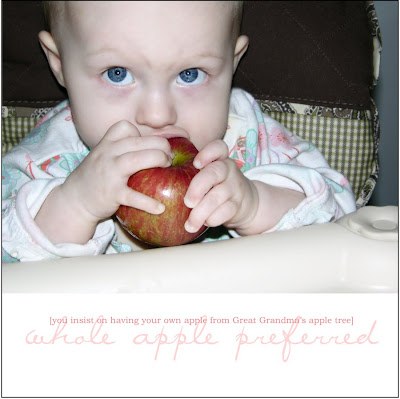
Some of you have wondered what happened to Kaelyn's first year photo book. I was finishing up the pages at night when we were on our vacation and when we got home soon after my computer was hacked so I lost quite a bit of my work on it. That made me lose all ambition for completing it for awhile... until I received an email from Blurb saying if I got it published before the end of August I would save $10. Well, that was enough to get me in gear again and I'm glad, because it is now finished and I finally have a few pictures of it to share with you. They don't show the details all that well, but I didn't want to make you wait any longer. So here it is... 110 pages, 7 inches by 7 inches, wrap around hard cover...

I used a variety of patterned papers to break up the abundance of photos and the other page I used as a journal... things about the pregnancy, after she was born and major events in her life... events I thought she would enjoy reading when she was older.

Kaelyn's definitely enjoying looking at the pictures!


All of the photos in the book except maybe 5 were taken with my Nikon 8700. Nothing overly fancy but does the job well and it takes little movie clips which are fun.

Here Kaelyn's looking at 2 photos taken by her aunt Amy.

For the back I scanned in K's footprints that were done at the hospital. It says [first footprints] so tiny yet already leaving large impressions.

I am very happy to be done with the book! It took several late nights and there were times I couldn't picture an end in sight, but I'm glad I pushed through it.

If you are thinking of making a book I suggest signing up with the company early on so you can get in on a good offer/discount. Make sure the photos you use are high quality, you can raise the dpi so they won't look pixelated if you enlarge them.

I upgraded with the premium paper from Blurb and I'm glad I did. That way when Kaelyn looks at it, it won't be easily damaged. The cover is also very durable so I'm very happy with that. The printing is a bit grainier than I would like. You can see it around letters and some of the pictures, but I'm very picky from making my own art prints. So overall, I'm a happy customer and will probably make another book using Blurb.

If you have any questions about making the book that I may have missed answering please let me know.

19.5.10

Digital Photo Book: Looking it Over

Sorry I didn't post anything last Wednesday about the photo book. I've been revising a handful of pages and I realized I left out 3 pages worth of pictures. Oops! I need to scan in Kaelyn's foot prints for one of those pages. Other then that I have been printing some out to see what they are going to look like. I printed the pages at 4" by 4" so 4 would fit on a page. I have to say they are so adorable it's tempting to just keep them like they are and forget about actually publishing the book through Blurb! But then I thought I could just put a ring around the little pages and have it so Kaelyn could look through it. No big loss if she wrecks this little one and I'm sure she would enjoy it. The pages could be laminated to be extra sturdy and safe around little hands.

Here are a couple digital books I made a few years ago:

This gives a couple ideas for making your own digital book and not have to send your pages to another company to print. For the black spiral binding on our wedding book I went to a little print shop and asked if they could bind it and it ended up only costing like $2! I laminated the front and back covers for protection and highly recommend doing that. The other little book was just a fun day David and I spent celebrating our second anniversary. The pages are glued front and back and laminated on both sides.

You may have a couple different choices of color for the spiral binding. Just ask to see what is available.

5.5.10

Digital Book: Layouts Finished


That's right! The pages are finally complete. The next step will be printing out small copies to make sure the photo colors look good and to look over the text. I will also be putting in some of the patterned papers to spice the book up a bit. (A little more variety is needed.) I can't believe I'm so close to the uploading stage! Hopefully that will all go smoothly.

27.4.10

Digital Photo Book: Clone Stamp Tool

Kaelyn's one year book is getting real close to being complete. I have 10 months worth already finished! Yippee! I'm looking forward to the finalizing stage where I can print it all out and see what needs to be revised. But before I jump any further I want to share one of my favorite editing tools in Photoshop with you. The tool is the Clone Stamp. It is awesome for cleaning up facial imperfections, not so lovely backgrounds... anything you want to clean up or get rid of... this is your tool. (Well the tool I like to use the best for it anyway.)
Here is a little tutorial of how it works:

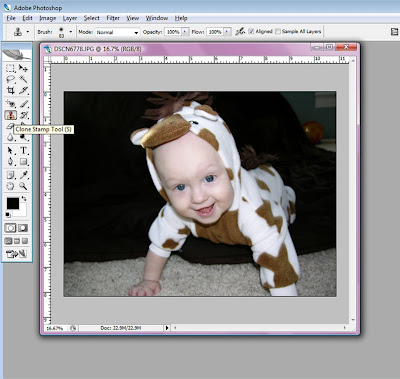
The clone stamp is shown on the left tool bar. Here I have it selected and the name has popped up.

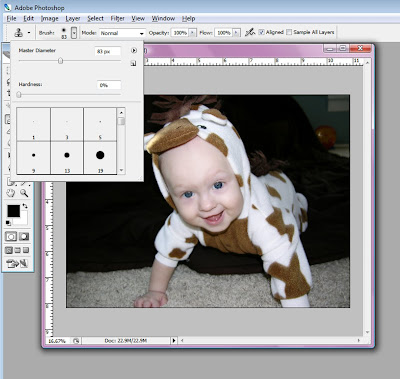
You will most likely want to change the brush size which is located towards the top. I have it selected.) If your going to be working on a face I suggest using a very small brush size and make sure you zoom in close to your subject. You will want Hardness to be at 0 or a small number. You may also want to play with the opacity level that is also located at the top. But if your working on a background a larger bush size works well for large areas and keep the opacity at 100%. When you get close to your subject make the brush size smaller and up the hardness so it matches or looks real. You can always undo if it doesn't look right.

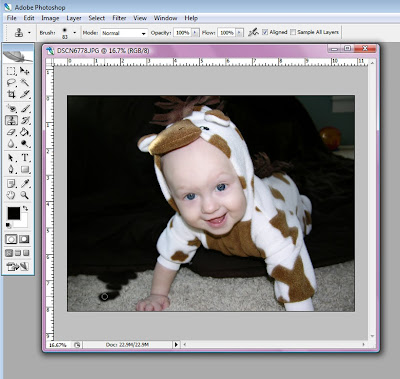
When you have your brush size set to your choosing you can click on your photo to get rid of the menu. Then hit Alt which brings up a circle with a cross bar. Put it over which ever area you would like to duplicate and click. Then you can click the area that you want to change and viola you have now used the stamp tool. Drag it around and fill in the areas you want changed. Alt and click as many times as you would like to get a realistic look.

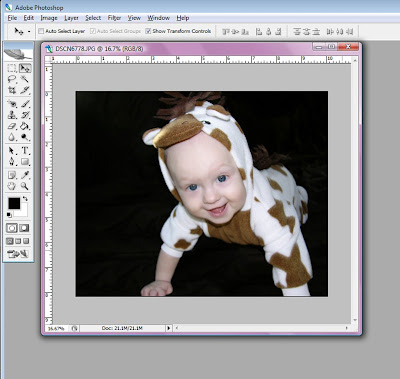
Here I just quickly did it to show you how it can change. If I wanted it to look very realistic I would have been more careful with the sheet pattern, but I just wanted you to get the idea.
When Kaelyn started crawling she wouldn't stay on a sheet for a solid background color so the clone stamp came in very handy! I suggest just playing around with the tool and you'll get the hang of it in no time.
Here are a few more pages added to Kaelyn's book:

21.4.10

Digital Photo Book: Keep Going

Hello, hello! Wow, things have been crazy here. Crazy but good. The last couple of weeks we've been spending a lot of time with relatives, getting ready for the art/craft show, picking up limbs at three households (my own even twice, thanks to the lovely South Dakota wind), working on some new projects and Kaelyn has had fun having the little neighbor girl over for some play dates. With so much happening I've still managed to get a few more pages done on Kaelyn's book. Not a lot but I have to remember that every little bit helps and the end is in sight! Next Wednesday I'll try to share another one of my favorite Photoshop tools with you. It is a must know for touch ups and cleaning up backgrounds. But for now I'll share just a few of my new pages...


I love the pictures of Kaelyn asleep on me. That rarely happened... seriously I could count the number of times on one hand! I think every time she fell asleep when she was a baby I took a picture! Funny I know. But seriously I thought all babies slept until she arrived. Now I know otherwise. Our little energizer bunny... love your energy... kinda wish I had some of it!

7.4.10

Digital Photo Book: Layouts and Photo Ideas

Kaelyn's baby book is over half complete! Very exciting! Today, I want to talk a little about taking photos. First of all if your using a digital camera... which most people today are, take LOTS. I take a whole bunch but usually only a handful are keepers. Which the good thing is I'm not out any money and the keepers are worth so much. These photos will be treasured keepsakes. Without them I wouldn't remember most of the wonderful happenings and how little Kaelyn once was! When your taking pictures, try to get an interesting angle. You don't always have to center your main subject. Off center is usually best. The good thing with Photoshop your able to crop and rotate your photos.

Think about the details when your taking photos. The details can include so many things like the subjects showing size differences, unique positioning to having different creative backgrounds... or just clean backgrounds. Its usually easier to get good backgrounds when shooting outdoors. When inside a home if there's a messy background, hang a sheet or drape it over something. Your photos will look a lot more professional. Lighting is also another detail to keep in mind. But overall, just have fun experimenting, be creative and snap photos you will want to keep or share with others.

31.3.10

Digital Photo Book: Photo Layouts

I'm getting so excited to see the book finished! I still have quite a ways to go but it is starting to go quicker. I found that after I have a section of photos retouched, that putting them all together on a page to see what goes together the best helps a lot. After Kaelyns first month was done I'm not so picky if the photos aren't exactly in order. I want the images to go well with what is going to be on the same page as well as the page next to it. (I do keep them in order by month.) I have a few of my favorite photos taking up the entire page... although I can't do this with all of them or my book would be HUGE! When I get to the end of the book I will have a tweaking stage where I'll revise what I've written below the photos and I'll test print the pages to see how they look. I may throw some out if I'm not completely happy with it. Anyway, here are a few of my newest pages...

I decided some of the pages didn't need text. There is always a section page saying the month so I didn't want to take away from the photos any more than I had to. Sometimes less is more.
I'm currently at 40 pages and am just starting month 4. If there isn't a holiday in a month they are pretty short. I'm trying to stick to just under 120 pages for the entire book... but we'll see, I'm glad I won't be paying per page!
I've really enjoyed going through my baby's photos! I still can't believe how quickly she's growing up. Although I miss her being so little I look forward to all the new experiences with her. Some of the smallest things excite her so... and I love it! She's my doll and I can't imagine my life without her.

24.3.10

Digital Photo Book: Retouching

I honestly can't believe how quickly Wednesday keeps arriving!!! Since last weeks post I've mainly been working on retouching some photos. It's crazy how you can take an ordinary photograph and with a little manipulation in Photoshop it can look pretty amazing. So here are just a few of my before and afters for the next section I will be working on. Cropping and changing the lighting are the main things I did to change these photos for the better!

{before}

{after-I think this is my favorite photo now!}

{before}

{after}

{before}

{after}

I just have to say, I LOVE Photoshop and I love retouching!!! If there is something you see on my photos that your wondering how I did it, just let me know and I'd be glad to share.

17.3.10

Digital Photo Book: Progression Stages

Happy St. Patrick's Day everyone! Well, I was able to pull myself away from creating in the studio for a bit this last week and work on the photo book. I made some good progress. This is what I'm working on... first I retouch the photos; I divide my book by months so I'm only retouching the photos for that relevant month and then follow by designing the layouts. That seems to work well so I don't get tired of just doing all the retouching or all the designing at one time. You don't want to get overwhelmed, otherwise you won't want to come back to working on the book. Here are a few of my layout designs:

I am so thankful for all the photos my husband and I took. I wasn't even much into photography at the time but I wanted to remember every precious moment and all of Kaelyn's adorable little features. If it wasn't for the photos I wouldn't even remember her being so tiny... babies grow up so extremely fast!

I'll be working on finishing another month for next time. I hope you have been breaking your book down into stages and have been enjoying the process! Its finally coming together... that's an awesome feeling!

10.3.10

Digital Photo Book: Organizing

Well, with all the craziness of the last week or so of completing my art room I haven't had much time to work on the digital book. But I have gone through all the photos that I have in folders on my desktop of Kaelyn's first year and now have all of the ones I like the most in a folder called digital scrapbook. That part was pretty time consuming since I had so many photos! My next step will be retouching them before I can work on more layouts. Most of them just need the lighting tweaked like what I shared in my tutorial HERE. If there is anything you would like me to share, please comment or shoot me an email. Thanks!

Oh, and there is another postcard giveaway from UPrinting going on at my other blog, Touched Creatively. Shipping is FREE this time! Enter to win if you would like to create custom thank you cards, invitations, baby or engagement announcements, business promotions... so many options. You have until Sunday at midnight to enter. (If you would like assistance with the design process I would be glad to help for a small fee.)

3.3.10

Digital Photo Book: Layout Designs

Today I'll share a few of my new layout designs. I added an extra element to all the pregnancy pages because it seemed unfinished. The pictures below give you an idea of what I did on the previous pages. I used the same written font that I used on the cover to give the background some interest. I like that the text overlaps in places... it adds another dimension.


The tutorial on changing your photos to sepia and lightening techniques can be found in last week's post HERE.


The rest of the pages should go a bit quicker now that I'm happy with the design. If it wasn't for this blog and saying I would post about this book every Wednesday I would have probably waited a few more months until I designed another page! Thanks for helping me focus! I hope your having some fun following along and I'm not just boring you. Happy Wednesday!

24.2.10

Digital Photo Book: Photoshop Tips

I did manage to complete a few more pages of the photo book, but I'm wanting to add another element to the background so it isn't quite so plain for some of the inside pages. I haven't had any extra time to try the things I have in mind so I will just share some tips on changing your photos to sepia and an easy way to lighten your photos. I'm sure there are plenty of different ways of doing both of these in Photoshop, but I'll share what works for me. I think every person working in this program should know these fun and simple techniques.

For the cover photo, I first started with the photo below. I first cropped the image to what I thought would look the best for an up close view for the front of the book. Cropping and playing with the rotation of your pictures can make them look entirely new and give a more professional look.

After cropping I decided I would like to make the photo sepia... a nice brownish tint. So to do this you go to Image at the top of the screen, down to Adjustments, then over and down to Hue/Saturation.

When your in Hue/Saturation, set the saturation to -100. This makes your image black and white. Click OK.


Then go back to Image at the top of your screen, go to Adjustments again and down to Variations.

Here you first need to find the bar with Fine and Course. Midtones should already be selected above it. There should be a moveable bar that automatically comes up in the middle, so you want to move it to the left, ONE notch. (See photo below.) Then click on More Yellow once, and then click on More Red once. Click OK.

Now you should have a beautiful sepia photograph!


Now on to brightening up photos. This works excellent for color photos, as well as black and white. If the Layers Window is already a good friend of yours, make it one. You can do so much with it! If it doesn't automatically show on your screen go to Window at the top and down to Layers. When you have it up, make a copy of your background by clicking the top right arrow and going down to Duplicate Layer...

With this new duplicate layer selected in blue go to the arrow that points down next to Normal. You can play around with a bunch of these options but for now I'm going with the one called Screen to lighten my photo.

First it may look super bright, but don't worry, just play around with the Opacity level until it looks good. When your happy with it, you can go back to the top right bar on the Layers Window and go down to Flatten image and save how ever you prefer. I save mine as jpeg.

That's it. Nice and simple and can make such a difference to your photos! Here is the before and after:

Not that this before one was that bad but using this technique on some pictures can make a world of difference! Have fun!