26.2.10

A Calming Peacefulness


Sometimes we get so lost in our hectic little worlds that we don't pay attention to the simple natural beauty that surrounds us. Jennifer Squires is a talented photographer from Canada who does a spectacular job of capturing ordinary scenes in nature and portrays it in such a beautiful way that we can't help but gain a sense of peacefulness when viewing her photos.


You may have already seen some of her work that I featured on Touched Creatively's blog HERE, but I wanted to share here as well because she was so sweet and generous to send me a print of Elviage Pearl seen below. Doesn't she do an amazing job of showing tranquility through her work?!

{Elviage Pearl}


Thank you Jennifer for the lovely treasure and the reminder to take a closer look at the simple beauty surrounding us that is often overlooked!

If you are interested in getting your own Jennifer Squires fine art print be sure to visit her etsy shop or find out more information about her and her work at her website.

Have a wonderful weekend everyone!

Unexpected Bike Swap Project

Yesterday was a busy day to say the least. Printing some orders, getting them ready for the post office, tackling Kaelyn to get her in her winter gear to come along, getting back and designing a postcard design that needs to be sent to the printer today, along with the normal daily tasks. Planned on painting the final coat on the trim, windows, and doors in the art room when David got home, but when he got here at 5:30-6:00 pm
he says: I have a project for YOU!

I said: Oh, what is it?

he said: The bike swap coming up... they sell all sorts of bikes, bike parts, gear, anything related to bikes including art! I talked to a guy that is selling stuff there and asked if he would sell some of your bike art since we can't be there, and he said he would.

me: Sounds good, when is it?

him: Sunday

me: This Sunday???

him: Yeah, the last day I'll see him is tomorrow (Friday).

me: What!?

him: Get busy printing stuff!!!

So this meant designing a couple more color options and quite a bit of printing. I also had to frame a couple for show. Hopefully people will enjoy them and want them in their home or office space. From 6:00 to shortly after midnight that is what I was working on. Here is a shot of just a few things going to the show:

The good part is even if they don't sell they will be ready to ship for etsy. I usually do print on demand, so as long as little hands don't get to them we should have a few in stock. If your interested in a bike print you can order through my Enduring Arts shop. Just a note: there are better photos of the designs in the shop. A few of the new color options aren't on there yet and the cards will be listed sometime soon after the show if you are interested.

Now, hopefully tonight I can work on my art room! When its finished, I'll be sure to share before and after shots of the room!

24.2.10

Digital Photo Book: Photoshop Tips

I did manage to complete a few more pages of the photo book, but I'm wanting to add another element to the background so it isn't quite so plain for some of the inside pages. I haven't had any extra time to try the things I have in mind so I will just share some tips on changing your photos to sepia and an easy way to lighten your photos. I'm sure there are plenty of different ways of doing both of these in Photoshop, but I'll share what works for me. I think every person working in this program should know these fun and simple techniques.

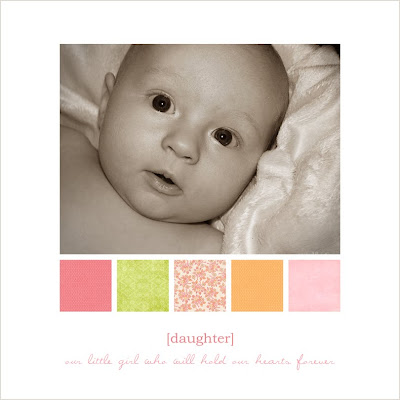
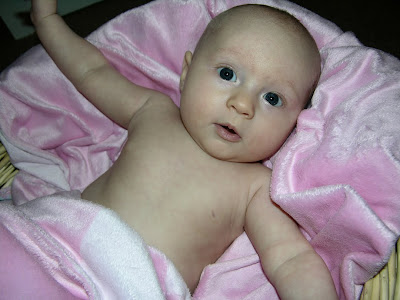
For the cover photo, I first started with the photo below. I first cropped the image to what I thought would look the best for an up close view for the front of the book. Cropping and playing with the rotation of your pictures can make them look entirely new and give a more professional look.

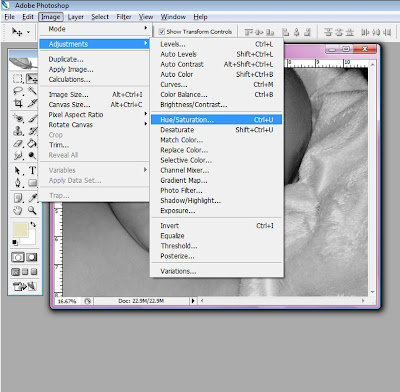
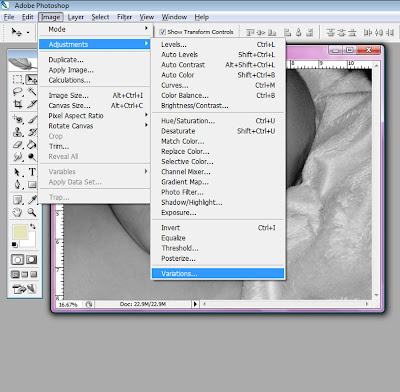
After cropping I decided I would like to make the photo sepia... a nice brownish tint. So to do this you go to Image at the top of the screen, down to Adjustments, then over and down to Hue/Saturation.

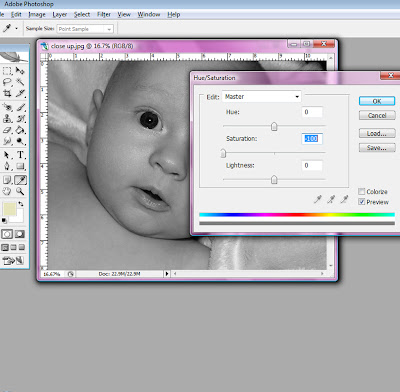
When your in Hue/Saturation, set the saturation to -100. This makes your image black and white. Click OK.


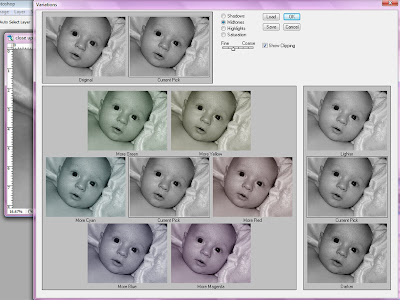
Then go back to Image at the top of your screen, go to Adjustments again and down to Variations.

Here you first need to find the bar with Fine and Course. Midtones should already be selected above it. There should be a moveable bar that automatically comes up in the middle, so you want to move it to the left, ONE notch. (See photo below.) Then click on More Yellow once, and then click on More Red once. Click OK.

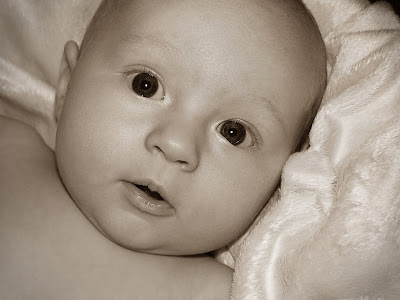
Now you should have a beautiful sepia photograph!


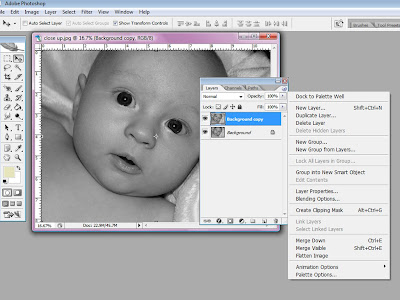
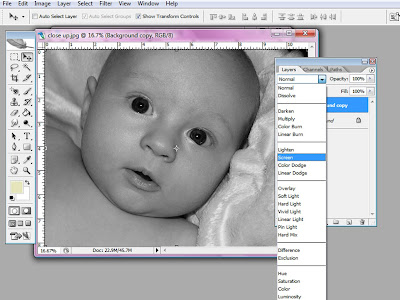
Now on to brightening up photos. This works excellent for color photos, as well as black and white. If the Layers Window is already a good friend of yours, make it one. You can do so much with it! If it doesn't automatically show on your screen go to Window at the top and down to Layers. When you have it up, make a copy of your background by clicking the top right arrow and going down to Duplicate Layer...

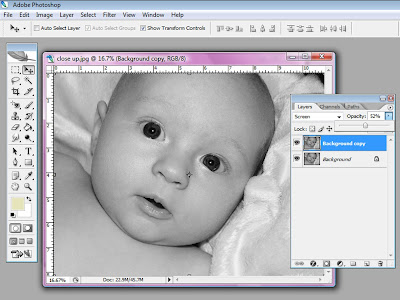
With this new duplicate layer selected in blue go to the arrow that points down next to Normal. You can play around with a bunch of these options but for now I'm going with the one called Screen to lighten my photo.

First it may look super bright, but don't worry, just play around with the Opacity level until it looks good. When your happy with it, you can go back to the top right bar on the Layers Window and go down to Flatten image and save how ever you prefer. I save mine as jpeg.

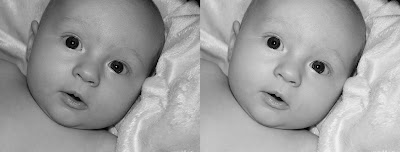
That's it. Nice and simple and can make such a difference to your photos! Here is the before and after:

Not that this before one was that bad but using this technique on some pictures can make a world of difference! Have fun!

Hearts for Haiti


If you haven't heard yet what Hearts for Haiti is it is a bunch of etsy shops uniting to help the people recover from the devastating earthquake of January 12th. We can donate our creations and this shop sells it for us, we ship it off to the customer and the money goes directly to Doctors Without Borders. (you can visit there website for more info.) Its a great way for those of us that don't have much money to help Haiti in another way. So take a look at the Hearts for Haiti shop... there are lots of wonderful handmade items. I donated my "Inner Strength" fine art print since the strengthening meaning behind it seemed appropriate. My posting just went live today so you can check it out HERE.

This art print was also featured in a fun and cheerful treasury this morning! You can view it here: http://www.etsy.com/treasury_list_west.php?room_id=88570
Thank you to Hailey Rose from Brydferth for choosing my piece to be part of the collection!

23.2.10

Cheese Over Cake

{photo from Kaelyn's second birthday}

Last week was such a whirlwind that I forgot to share how Kaelyn's two year check-up went. I know some of you were curious as what we would find out about her allergies. Well we didn't get any verified answers really, but things do look good. When I took Kaelyn to the appointment she was her usual loud self in the waiting room yelling 'hi' to people across the big room. But things soon changed when they called her name and she realized she was the one being checked. She's so terrified of needles that she stayed as close to me as possible and only whispered a couple answers to the nurse when asked. So the doctor said that they didn't want her to be so scared every time she came in and decided against doing any more allergy testing or other vaccinations at that time. Her doctor said to just keep gradually bringing back the products with egg and milk and see if she has any more reactions. We're supposed to try yogurt again with her before switching her off goat milk but she isn't cooperating on that, so I think we'll just try it after she goes through whats left of her milk in the fridge. We're still working our way up to the actual cooked egg whites too. But we are very happy that she is now able to eat cheese and her weight showed the results. She had been at the 10th percentile on weight for her age group, but now after having cheese every day, several times a day for the last 3-4 months things have certainly changed... she is getting closer to the 50% range. Her birthday photo above proves how much she has missed having dairy products in her diet; she chose cheese before any cake... but chocolate cake did soon follow! She now weighs 26lbs and is 33.5" tall. Way to go Kaelyn!

22.2.10

Body & Soul Spa Day

{image via Aubrey + Lindsay}

A bright, refreshing photo to go along with some relaxing and refreshing weekend happenings. Saturday was a little birthday celebration for my mom. Then Sunday I went to a Body & Soul Spa event held at my church with my grandma and mother. I have to admit, I wasn't too excited to go. I had flashbacks to a similar event back in college and it just wasn't worth while, and you know with so many things going on in your life you just think is this the best way to spend my time??? But it turned out to be amazing and the ladies that put it on did an outstanding job. This is what it consisted of... there were a variety of little stations set up like manicures, pedicures, facials, labyrinth where you colored in the path, and a massage from an actual licensed massage therapist. You could pick anything you wanted. While you waited for your turn you could eat a variety of yummy cheesecakes, drink coffee, chat with others, or read a number of cards that went along with bible verses. There were also an arrangement of homemade recipes to try like lotions, sprays, oil treatments and more. Every church should set something up like this... it was a great time for fellowship, relaxing and being pampered by another member of the church. (There was also free babysitting provided.) I think this event should happen every Sunday... especially since your supposed to relax on the seventh day anyway! :)

19.2.10

Refreshing Spaces

Renovating two houses has sparked my interest in interior design and decorating. Here are a few cheerful spaces I came across. The brighter colors add such a punch to the room and give off a sense of motivation. Just love them.

18.2.10

Photography Collage Poster Design

A couple weeks ago I was busy with this collage design for photographer, Kevin Bierbaum. Overall size of the poster measures 20"x30". View more of his work HERE.

16.2.10

Digital Photo Book: Layout Design

We have a very full day planned tomorrow so I decided to post a few tips on layout design for the digital photo book a bit early. Since I picked out fonts, papers and designed the cover and intro page last time (can view here) I now focused on the first section of the book... which in my case is pregnancy. I decided to have a two page break between each section of my book. One page will be a full color patterned page like this:


This will tie in the blocks that I use on the cover and intro page and it will break up all the white space... adding some variety. Remember to keep unity and variety in mind when creating a professional looking book.

My second page that goes along with the patterned texture page with each section will be something like this:

This page will tell what happened in the section of photos to follow. (Note: the color and quality will look much better on the actual page printout.) I used the same fonts as before for unity. Now onto the fun part of photos. Don't worry I won't show you every single page of the book. I don't want to bore you, but these first few I'm going to show I want you to notice that when two pages are side by side that there are similarities on the layout design.
Its best to keep some sort of grid throughout your book. My text under or above the photos will remain at the same distance apart. And if you can imagine the two pages above being next to each other you will notice that the photos line up when looking across the pages. You don't need to keep them exactly the same but you should have something line up like either the top or the bottom of the photo for consistency. Here are two more pages that will go next to each other and it shows an arrangement idea of several photos put together.

I noticed I need to nudge the 3 photos on the left side over to the right a bit. I think it looks better when the white space is even between photos. I was glad hubby took these photos of us together so Kaelyn can see the pregnancy stage when she's older. Nothing fancy but they're great for the memory book.

Okay, next weeks agenda... break down photos that you want to use in the next section. I decided to do three months for each section. So I'll try and find favorite photos from Kaelyn's first month or two. Next week I'll share some super simple photo tips that you can do in Photoshop to make your images stand out. I'll show you an easy way of brightening up a photograph and also a quick easy way of making your own sepia colored photo... along with a few more of my new page designs.

I hope this is encouraging you to complete your own photo book!

15.2.10

Handmade Outfit & Happenings

Last Thursday Kaelyn wore her new outfit made by her Grandma Shari. This was one of Kaelyn's adorable birthday gifts. Grandma made the hat, vest and belt! So cute! We were able to wear something a little more special on Thursday because David had a special delivery for one of his Wisp Woods clients. Kaelyn and I were lucky enough tag along and go out for Guadalajara's before the delivery... an early Valentines Day celebration. Kaelyn loved having Mexican.

Some other tidbits about Kaelyn and our weekend: Thursday afternoon Kaelyn was sitting on Grandpa Bob's lap drawing and I believe he was talking about her writing his name and she said, "Bob, B-O-B"! That was a pretty exciting moment! We had no idea she could spell. I hadn't even been working with her on it. Then Friday night she surprised me once again and counted to 10 with no help at all from me. Usually I have to help her with a couple numbers since she likes to say 6 instead of 3, but that time she got them all right the first time! Did she really just turn 2 or did she skip to 3 or 4?! I'm definitely proud of my little girl... she never ceases to amaze me.

Friday Kaelyn and I finally made it to our friends house that we had scheduled back in January but due to a snow storm we had to push it back. We were able to see their new house and Kaelyn was able to play with her 2 yr old friend, Sydney. She had a lot of fun and was in tears when we got home because she wanted to go back! So more play dates are a must!

Saturday we were heading to Watertown to do some shopping and celebrate David's sister's 30th Birthday. We made it about 15 miles from home and so much snow was coming down we could barely see the road or the truck that was just a little ways in front of us so we had to turn around and go back home. I was pretty bummed since I was looking forward to some fun shopping with Amy and Kathy and Kaelyn was heartbroken when we arrived right back at our own house. She was sobbing on the floor! She had been talking about Kathy and Amy since last Wednesday and I had to tell her we couldn't see them due to the bad weather. Kaelyn has such a soft heart... I sure hope it toughens up before she gets out in the real world! Anyway, since we were home David and I were able to get some work done on the room that is soon going to be my art studio. I am so excited to have the kitchen table clear of all my art projects. I can't wait to organize my room to have everything I need; art supplies is currently spread out over 3 floors!

Sunday... Valentines Day. Daddy spoiled us with gifts in the morning, then off to church and Kaelyn's Great Grandma took the family out to eat at the little cafe on main street. Their home cooked food is amazing! Small town cafe's treat their customers like family. You get so much yummy food with dessert included! Definitely one of my favortite places to eat. The remainder of the day was quiet and relaxing... nice!

I hope you all had a wonderful weekend!

14.2.10

Be Mine... Puppy Love

Happy Valentines Day!
{super soft puppy valentine from daddy}

Hope you had a wonderful love filled day.

10.2.10

Digital Photo Book: Cover & Intro Page

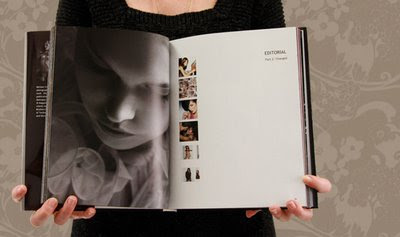
Yippee! The beginnings of a photo book! Anyone looking for tips and techniques on creating a professional looking digital book is welcome to follow along. Every Wednesday I'll try and share something new until my book is finished. First of all I have picked my size, square 7x7. I figured if I made several of them and give them to Kaelyn after she graduates I didn't want them taking up too much room. I am also going to have Blurb print the finished product. I talked about this in last weeks post here.

Today I want to talk a little about layout design for a professional look. Keep in mind while designing your book that you want unity yet some variety throughout. You can pull unity in by keeping your fonts the same through the book and using some type of grid for picture and text placement. For some variety to keep the book interesting while paging through it, you could do some fun things with color or textures or even adding some fun quotes here and there just to break up the monotony of photos.

For my book I want to keep a clean, sleek design. In the design world, less is more. So I am having lots of white space with splashes of color here and there for interest. I picked two fonts, Bookman Old Style and Miss Brooks. Most times it is best to never use more than two fonts... or you'll get a messy look. However I have seen where 3 fonts do work but you have to be really careful. It is your book though, so I'm just offering suggestions... do what makes you happy! Here is the cover design I came up with for my daughters first year:

{digital photo book cover}

I thought the font Miss Brooks was a nice handwritten font that would give a more intimate feel when trying to portray my heartfelt thoughts to my daughter. There are several free fonts on the web if you don't have many on your computer. Just do a google search: Free Fonts and you can download them.

My pops of color are going to be digital scrapbooking pages. Thanks to Shabby Princess who offers these beautiful download pages for free! There are several other places you can find scrapbooking paper by doing a google search again, or you may choose to do solid colors or take pictures of different textures to use for backgrounds... there are so many options.

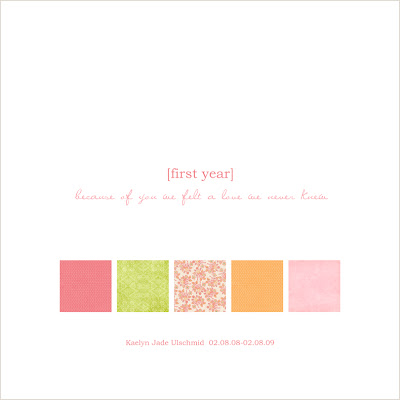
Now lets talk about having an introduction page. This is a great page for tying in the cover to what the rest of the book is about. It gives a more professional look to the book. Here is what I came up with:

{introduction page}

Its best to keep this page pretty simple. This page would work great for favorite quotes that are relevant to your book's theme. I used the same blocks in the same place that are on the front to keep the unity. The fonts are also the same. I hoping that I'm able to use the floral design block as a full color page for the inside of the covers... this would add some nice variety.

Now that the cover and introduction are complete we can start on the body of the book. I've been breaking my photos down into sections. I picked my favorites for my first section which will be pregnancy and will share some design tips about those pages next Wednesday.

9.2.10

Perfect Giveaway for Little Girls!

Looking for adorable fashion accessories for a little princess? I was thrilled when Avoni's Boutique sent me a link to her shop and suggested we do a GIVEAWAY on my other site, Touched Creatively. Tsasa is giving one lucky person this Felted Cream Rosette Headband/Bow!

{giveaway item~made to fit the lucky winner}

For more information about the giveaway and to see more of Tsasa's precious creations like the tutu below and many more available items click HERE.

8.2.10

She's Two!

Happy Birthday Baby Girl!

{Even though your a big girl now, you'll always be my baby!}
Here are a few shots from her winter garden party:

Since Grandpa Bob's birthday was Saturday we celebrated his and Kaelyn's at the same time. In the shot above Kaelyn was busy eating grapes. Yeah, she was more interested in eating grapes and cheese before cake! Thankfully she seems to have outgrown her egg and milk allergies. She will be tested again soon for verification. But she's been eating cheese for a couple months now and it seems to be going real well... and she LOVES it!

I made Kaelyn a white butterfly cake and my dad a chocolate cake with fudge frosting. I can say I was never meant to be a cake decorator but I sure gave it a try. I was happier making cupcakes with butterfly toppers. I like my paper products... as you can probably tell from the wall decor. :)

One of her favorite presents... a drum set from daddy! I have to say its pretty darn cute and she sure knows what she's doing. She's quite a little replica of her father. Her adorable flower headband was made by her Aunt Amy. Love it!

She got so many fun gifts! Thanks to all those who came and celebrated her big day!

Looking forward to another amazing year with you kiddo! You are such a special entertainment!

5.2.10

Kaelyn's a Model!

Just had to share a quick tidbit... Kaelyn is a model on etsy! Check it out HERE. Cheryl from Just Girls & Boys liked the photos so much she asked if she could use them in her shop. I hope this cutie pie helps sell some of her handmade outfits cuz they're fabulous!

Hubby is just starting to get over the stomach flu here. Really hoping Kaelyn and I don't get it. I have lots to do before the big 2 birthday party on Sunday. Have a great weekend!

3.2.10

Join Me in Creating a Digital Photo Book

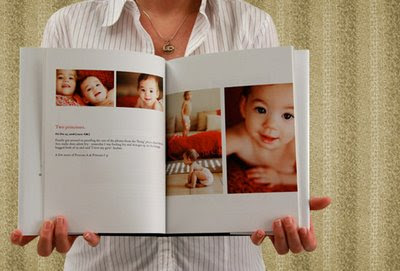
All right I'm committed now. My daughter turns 2 in less than a week and I still don't have her first photo book done. I either rearrange my time so creating it doesn't fit in the schedule or I overwhelm myself from looking at all the photos and get nothing accomplished. So here is my new plan... I figured if I commit to completing this project on my blog I can also help motivate others who are in a similar situation. I don't want to just show a picture of a page I designed but instead involve you readers to join me. Every Wednesday I will offer design tips, Photoshop techniques, valuable links, layout ideas and motivation for us to get this photo book created. Now you may not get all that information in one day but over the process of the book you should (I'm hoping) learn something new. What could be better than learning for free!? Also if you have any questions during this journey please feel free to ask either in comments or email me at enduringarts@gmail.com. I'll try my best to answer.

For this project I will be using Photoshop and Illustrator. You don't need Illustrator but a program similar to Photoshop is pretty necessary. I'm sure you already know your subject matter, whether its wedding, engagement, baby, child, portfolio... whatever it is find the pictures. [Warning: Do Not get overwhelmed looking through them all right now!] First, lets think about the size of the book we would like to create. If your not quite sure you might want to browse through different publishers to see what sizes they offer. If you google digital photo books, several options will come up. Here are a few: Blurb, My Publisher, Picaboo, and Shutterfly. They are all a little different and some require no design software but I'm hoping to make an extra special and unique photo book. I want it to look professional and creative. I hope to have a wonderful keepsake for my daughter.
I've already decided I would like to use Blurb for my book. I like their hardcover image wrap option and they specify the number of pages with a price... its not like if you go over 20 pages add this much to each additional page. I don't want to worry about doing the math because I'm sure I'll go over 20 pages and I don't know by how much yet. Blurb also has a nice selection of sizes and your able to browse through already made books for ideas.

This week: Decide on a size and publisher. Next Wednesday we will start designing the cover and introduction page. Start thinking about colors or papers you would like to use throughout your book. I will offer some ideas and links next week. I hope you will join me on this exciting adventure!

1.2.10

My Baby Girl's Birthday Invitations

It seems like just a few months ago you were born... even though I can't really remember you being only 6lbs! (I was too sleep deprived!) Now you are such a big girl. Talking all the time and for about the last month you have been saying you're two. Slow down! Before you know it you will be starting school, so please don't rush your age any more than you have to! It seems like you come up with something new everyday and I'm so lucky and happy I get to witness it. This morning you were fake coughing and saying "I sick." Not sure where you got that from but you made me laugh! You tried so hard to make me believe you. (Unless your laying down for more than 2 minutes, I don't think I'll ever believe you. Your too much of an energizer bunny to stay still and fake being sick!) You are one entertaining little girl. This coming Monday you really do turn 2 and family is invited to come help celebrate on Sunday. I hope you have a wonderful day!

About the invite: The adorable outfit was made by Cheryl of Just Girls & Boys. She took Kaelyn's measurements and made it to fit her perfectly. Her prices are amazing. I even hit this outfit on sale before Christmas! Its tempting to have Cheryl make Kaelyn a whole wardrobe. My talented mother made Kaelyn's hat. (She wears it a lot as I'm sure you've noticed seeing it in earlier posts.) After a couple challenging photo shoots with my little busy body we finally got some good shots and were able to start designing. I quickly drew a flower graphic that went with the outfit using my genius pen. (That is one amazing tool!) Then I printed the designs out on luster paper and the second birthday invitations were complete.