Showing posts with label Before and After. Show all posts

16.4.14

Natural Cleaners & Sticky Residue

I haven't bought a cleaning solution in years. Instead I make my own. It is so much better than using toxic chemicals and it's cheaper too. What do you need? Just baking soda, vinegar and water for an all purpose cleaner. Simple. I use it for cleaning everything. I did have my first problem with the solution when taking some old stickers off my daughters four wheeler. First layer came off fine, but there was a nasty residue that just didn't want to come off. I was determined to get it off naturally. The missing ingredient was coconut oil. Yep, sprayed on my all purpose cleaner then I put on some organic unrefined coconut oil (it has so many awesome uses!) and was able to scrape the old stickers off a lot easier! Yay!


{rubbed coconut oil on top of the sticker after it had been sprayed with the all purpose solution}
The four wheeler looks so much better without the outdated stickers. We were able to sell it at a children's sale for triple the amount we paid for it plus made extra money that was donated to the Children's Miracle Network. Awesome! It is so much fun finding great deals and making things look better for a small amount of money. I probably see too much potential in things sometimes. My husband thinks I need to downsize. Hmmm. Guess I should flip a few more things.

Back to the natural cleaners. With Kaelyn back in doors lately due to cooler temps, I found stickers being put where they really shouldn't be. And of course they are the STICKY stickers. The kind where only the top layer comes off. Urrr. Was not happy to see it on the door and window. We've had a number of them on the fridge. Kaelyn learned her lesson when I told her she had to take them off and she struggled for a long time. Out came the all purpose solution with baking soda, vinegar and water and it took care of the problem easily.


Yay for no more stickers! Boo for the snow that came. That's South Dakota weather for you.
Drastic temp changes.
Last week as I had posted, Wednesday did turn out to be a gorgeous day. 77!

Five days later...
34 degrees (that wasn't the low of the day) and it is snowing. Quite a bit more snow came today. Shucks. So looking forward to the warm weather sticking around for awhile. The one thing I want to stick!!! :)

I don't really measure the ingredients for the cleaning solution but it is close to this if you want to make your own:
1/2 cup vinegar
1/4 cup baking soda
fill the rest of a spray bottle with water

*try adding coconut oil for removing tough sticky residue

29.1.13

House Project ~ Bookcase Built-ins

Yay! We finally have bookcase built-ins! I have always wanted some in our home... they add such a welcoming, cozy feeling to a space, and my husband is pretty much a bookaholic. :) I was lucky that he left me a couple shelves to fill and Kaelyn got half of a shelf... but he did make her her own bookcase for her room quite awhile ago so it's okay. (You can see a glimpse of it in the nursery tour HERE. Her room has changed quite a bit and her bookcase definitely has a lot more books now.)
 
I really wanted our many stacks of books all over to be better organized. Well when David got the urge to build some bookcases over Christmas break I said it had to go from floor to ceiling... because really that is the best use of space. So glad he went with my idea!
 
So here is the only picture I could find that showed a glimpse of the old bookcase we had in the room before. It worked great but didn't hold near the amount of books we needed it to.
And here is the in progress photo showing what hubby designed and built for the space...
Several people wondered if we'd be able to fill much of it. Ha, ha. They had no idea!
 
Anyways, then it was my job to caulk and paint. Hubby was so excited to get his books on the shelves that he actually helped paint. It was almost killing him to wait a few days for the paint to cure before putting anything on the shelves. :)
Not much space left in this bookcase so maybe we'll have to make another one for our living room someday, right hun? :)

30.12.10

DIY Project Before the Holidays

Hello friends! I hope you all had a wonderful holiday break. I have tons... ok several things to share with you. First off I'll show you another DIY project. Everything I look at I see possibilities... which is nice for the pocket book and probably the environment too... things don't simply get trashed. So first off is this buffet/dresser which a cousin didn't want anymore and I'm always on the search for more storage. This was a perfect addition to our kitchen.

Before: painted brown... not so pretty.


Then I've always wanted a nice way to show Christmas photos so I figured I'd make my own photo board. This frame was really nice but not quite my style. The cheaply framed cork board was going to be trashed at hubby's work so he brought it home for me. :)


So here is what I did with some primer and white paint:


Don't these items look much happier?! White gives a nice clean, fresh feeling and it goes with everything else. If it was colored I'd most likely get sick of it pretty quick. And the total cost was $5! That's right. We had the paint already from other house projects. The frame was found at a garage sale and everything else was free! I was going to change out the knobs but they actually looked good with the black and white stove and the counters in the kitchen are charcoal. I'm definitely getting lots of enjoyment out of this thrifty makeover. Hope you enjoyed seeing it.

5.11.10

Saved from the Trash

I'm always on the look out for things I can transform from ugly to pretty and usable. Since I've always stuck to a strict budget I like to look at things from a creative point of view. Well one of my last finds was sitting curbside ready to go to the dump. I couldn't let something that was so sturdy and in pretty darn good condition go to the trash! Sure the colors were completely out dated and there were a few little scratches on the side but I knew with a little paint it would look LOTS better. So here is the before:

The coloring was actually a little lighter than the photo shows. The top was made out of the old formica but the rest was a nice hardwood.

Here's the after:

A clean white look with brushed silver pulls. (Same ones that were there just spray painted.) I really like how it turned out. Who can't use more desk space and someday it might even be Kaelyn's if I can part with it. :)

My mother-in-law gave me a few treasures last weekend. I was so excited! One will be a perfect chair for this desk... just have to get it painted.

Linking up with Studio JRU today. Be sure to check out these other talented souls HERE.
Have a great weekend!

25.10.10

Major House Project

This post will explain what I've been so busy with last week. Non-stop work from Tuesday through Friday... scraping, taping, priming, and painting. It was a job! Since the inside of our house has done a complete 180 it was time the outside felt some love.

Here are a few before and afters. Note that this house was moved to town in the early 1950's, not sure when it was actually built. I like the charm of an old home!
{before}
{starting to scrape; new door has been installed}
{after: color adds character and makes the trim work pop!}
(another angle: scraping}
{after}

A little difference don't you think? In the spring we will be working on a deck and a little landscaping. So happy to have this big job done. I'll tell you it was pretty scary! A friend lent us scaffolding, but boy it pretty much terrified me climbing up on that thing. It felt like I was 3x higher than I really was and when it wiggled I seriously thought I was going to puke! Thankfully my dad brought in his loader and lifted me up in that. It felt like I was at an amusement park. There was a section that my dad had to put David up high in the loader with a ladder on top of that to reach a part the scaffolding couldn't get to. That was extremely scary... yes, I was praying that everything would turn out smoothly and thankfully it did! And a huge thanks to my mom for watching K while I was working on the house! Hubby and I couldn't have done this job so quickly without the help of my parents!

8.9.10

Kitchen Before & After

Our kitchen renovation isn't completely finished but I thought I'd share a quick before and after photo. Several things bothered me about the old blue cabinets. The upper ones didn't match the lower ones, a good number of them didn't like to shut properly, and the inside wasn't in all that good of shape. And the floor... "yuck!" that sums up what I think of them. As soon as we moved in we put a new fridge and dishwasher in. White appliances went better with our old house and we kept the white gas stove that was here. The fridge was too tall to fit so we had to knock out the cabinets above it right away which showed a nasty pink/salmon color behind them (reason for my big painting trying to cover it up).

I hand textured and painted the walls, made the curtains, and handy hubby custom made the beautiful cabinets out of ash. Now this space feels so much cozier and I enjoy spending time in it.

Yes, so much better don't you think? I still can't believe it's my kitchen.

27.4.10

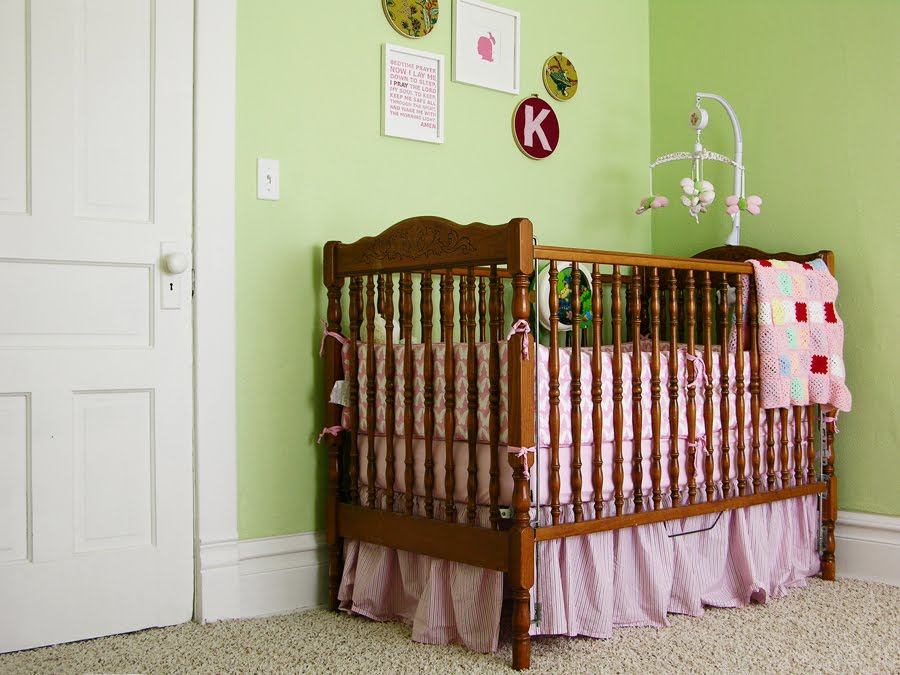
Kaelyn's Nursery/Toddler Room Tour

Ha, ha! Do you remember this post here where I said I would post pictures of Kaelyn's room when it was all decorated? Well, I'm finally going to share it with you! Oh where does the time go. Its been done for awhile now, and guess what, its probably one of the least expensive nursery, or now toddler rooms you will find! Almost everything is DIY projects and I think it turned out pretty fun!

I asked my dad if he could whip up a little art table for Kaelyn. He had it done within a couple days and she loves it for drawing and her tea parties! The fabulous easy to clean chairs came from Walmart of all places for only $5 each!

The doorways and windows show the character of the old house we live in. My favorite feature.

I did the modern canvas painting of Kaelyn from when she was 4 months old. The flag banner was made from some scrap fabrics. The 'read' wooden letters came from Hobby Lobby and I painted them red. Hubby drilled holes in the back for me to hang them. Hubby also made the bookcase. Kaelyn really needed that with her huge collection of books! The dresser came from my brother. It was blond with gold handles... we modernized it!
Curtains came from the World Market. My mom bought Kaelyn the beautiful stain glass hanging from a lady who makes them here in our hometown. Have to love all the handmade goodness!

David picked up the crib for a steal. He had to fix a couple springs but after that it was in good shape. The plan was to paint it white but with all the other house renovations going on it never got done.

The wall decor was a fun and easy project. The hoops came from Hobby Lobby and were spiced up with some fun fabric scraps. The 'K' was hand stitched on.

The silhouette picture of Kaelyn was made using Photoshop and Illustrator. I'll try and share a better view of it in another post. The prayer is like the ones available in my etsy shop. I always had a prayer over my bed when I was little so wanted my daughter to have something similar.

The closet door was one of the major project remodels in this room. We widened the closet opening and put nice folding doors in. It made for a lot easier access to everything inside.

That concludes the tour of Kaelyn's room. Hope you enjoyed it!

9.3.10

Before & After DIY Room Remodel

Okay, here they are... some nasty pictures along with some pretty nice ones. This room has come a long way and I'm so happy to now have an art room where I can create without anything getting in the way. I'm no longer taking up the kitchen table! Yippee!

Before I get to the photos I want to share that my husband and I have been redoing this old house from bottom to top for the last 2 and a half years. (My dad was a huge help on gutting out the basement and completely starting over!) We still have a little ways to go but we're getting there slowly... not so easy with a busy toddler under foot if you know what I mean! I debated about sharing the before pictures, and hubby said, "your not going to show the world our ugly house are you?", but you know what, I am. This is why... some people said we should have burned the place down and started over... yes it would have probably been easier and sure we had moments where we wondered why in the world did we move into this house. Most people would have never thought about buying it because it looked like a disaster and they wouldn't want to do the work, but when you don't have a load of cash laying around you... or at least I, look at things in a whole new way. I look at the not so pretty things and wonder how I can make it into something amazing. So I'm hoping to at least inspire someone with these photos... to look past what you first see... to look at the possibilities of what could be and to use your imagination. Now even though we have done a lot of work to this house it is far from perfect, but you know what, its the quirks of an old house that gives it character and a charm you won't find in a new one. So here it is before and afters before I moved furniture in:

{before}

{after}

{Yikes! Nasty water leak had been fixed years before but never cleaned up.}

{before-in progress}

{after}

{Another nasty before!}

{after}

{before-in progress}

{after}

{before}

{after}

Now this room is my favorite in the house, when I'm in it, I don't want to leave... I do have all of my art stuff/furniture in it now but it isn't decorated yet. Our hard work + a small amount of money = a beautiful room! Hope you enjoyed the photos! I'll be sharing the kitchen redo once my husband finishes the upper kitchen cabinets!